Showing posts with label greens. Show all posts

Wednesday, November 1, 2017

Catching up

The fall has been busy at the golf courses for the City of Ann Arbor. I want to apologize for not keeping up with blogging more. I will make up for it by offering up a quick summary of some of the projects we have been doing.

New Practice Green for Leslie Park

At the beginning of September, we stripped this area of rough behind #1 tee.


We added 60 tons of sand mixed with top soil.


Shaped it and seeded it with bentgrass. This will be an additional practice putting green. 


Five days later, the grass was starting to germinate.


Two weeks after seeding, it looked like this. We have now mowed it three times at 0.400 inch. In the spring, we will slowly bring it down to our normal green cutting height of 0.125 inch.

Level and expand tees at Leslie Park

Some of the smaller tees are getting noticeably mounded in the center. This comes from golfers taking shots from the same spots and maintenance filling the divots with sand and seed. After 20 years, the center of the tee may have grown by 6 or 12 inches. 

This forward tee on #9 was stripped of sod and leveled.

Sod from a different tee was laid out on the level surface.

It looks like we will only get to the two forward tees on #9, the white tee on #18 and the right side tee on #7 this year.

Rock wall on #7 tee at Leslie Park

As part of the leveling of #7 tee at Leslie, we are also trying to expand the usable teeing area on the back of this tee. In order to accomplish this, we are adding a rock wall, which will allow us to build up the back corner of the tee.

Geo-textile fabric is laid out behind the rocks to keep erosion to a minimum.

Cart paths and rock walls at Huron Hills

New cart paths were added to #13, 14 and 15 at Huron Hills this year. They tie into the path that was put in last year on #12. In order to keep to contours of the holes as close to original as possible and still have a fairly flat path, rock walls were also put in here.

#13 at Huron.

#15 at Huron.

Fertilizing Oak by #5 at Leslie

This oak on the right side of #5 fairway has been declining in recent years. Last year, we pruned all of the dead wood out of the canopy and de-compacted the soil around the tree.

We had a leaf tissue analysis done this year and found out that there were some micro-nutrients the tree was lacking. Micro-nutrients are nutrients aside from the big three of nitrogen, phosphorous and potassium.  Here the arborists are preparing to inject the nutrients into the tree's bark.

A close-up view of the system of tubes and injection sites.

Greens aerification and top-dressing.

During aerification, I would always break tines on the front, left corner of #2 green at Leslie. After doing so again this year, I decided to dig up the rock that we kept hitting.

This little guy will love it's new home in the rock wall on #7 tee.



Wednesday, October 2, 2013

Fall Aerification

We have begun the Fall projects at both Leslie Park and Huron Hills. We aerify in order to decrease compaction in the soil and to slow the accumulation of organic matter in the soil. We can do this by either removing the plug created when we "punch holes" or by dragging the plug until all that remains on the surface is the thatch layer.

We use the first method on greens. We remove the plug and then put down a layer of sand. This sand is then worked into the holes left on the surface.

The plugs of soil, grass and thatch removed from a green.

Spreading sand on #12 green at Leslie Park.

The finished product.

On the tees and fairways, we will drag the cores around to mechanically break them up. The soil will go back into the holes while the plant material will not and be able to be removed, usually by blowing it off the playing surface into the rough where it will be mulched into the grass.


Here we are using a tractor mounted aerifier on #8 tee at Huron Hills.


Fairway plugs. Notice the larger diameter. We use 3/4 inch tines on fairways and tees and 3/8 inch tines on greens.

A turf vehicle getting ready to drag the cores on a fairway.

All that remains after dragging is the grass and thatch.


Blowing the thatch off of a fairway.

Since Labor Day, we have completed hollow tine aerification on all of the greens at Leslie Park except #8, #9, #11, #12 and #18. We elected not to do those greens until later in the fall in order to minimize disruption to golf play. We have completed all of the tees at both Huron Hills and Leslie Park as well as a number of fairways at Huron Hills. We are now working on the fairways at Leslie Park. We have also done a solid tine aerification of the greens at Huron Hills. This is done by an outside contractor with a specialized machine. It uses 14 inch long, 1/2 inch diameter tines. This allows for air and water to infiltrate much deeper into the soil than the 4 inch long tines on the aerifers that we have. We plan on hollow tine aerifying the greens at Huron Hills next week.

We know that disrupting the playing surface, especially on the greens, is one of the least favorite things for golfers. That being said, it is necessary to do this in order that the golf courses can handle the number of rounds we enjoy at Leslie Park and Huron Hills. A small inconvenience at this time of year will allow the turf to survive during the long, hot summer months.

Wednesday, June 26, 2013

Hydraulic Leak

On Monday, June 17th, our greens mower suffered a hydraulic leak in one of the hoses that run the cutting units. This happened on #1 green. Leslie Park uses a hydraulic oil that is not petroleum based. This makes the chance of a hydraulic leak killing the grass a little smaller, but often the culprit is the heat from the oil as much as the oil itself.

Since the leak happened on #1 green and the morning was relatively cool, I had hoped that the grass would recover from the leak. This past weekend, I determined that the grass was damaged enough to replace it with sod from the practice green.

Here is the leak. Unfortunately, it was right in the middle of the green, lined up with the fairway.

The leak a couple of days latter.

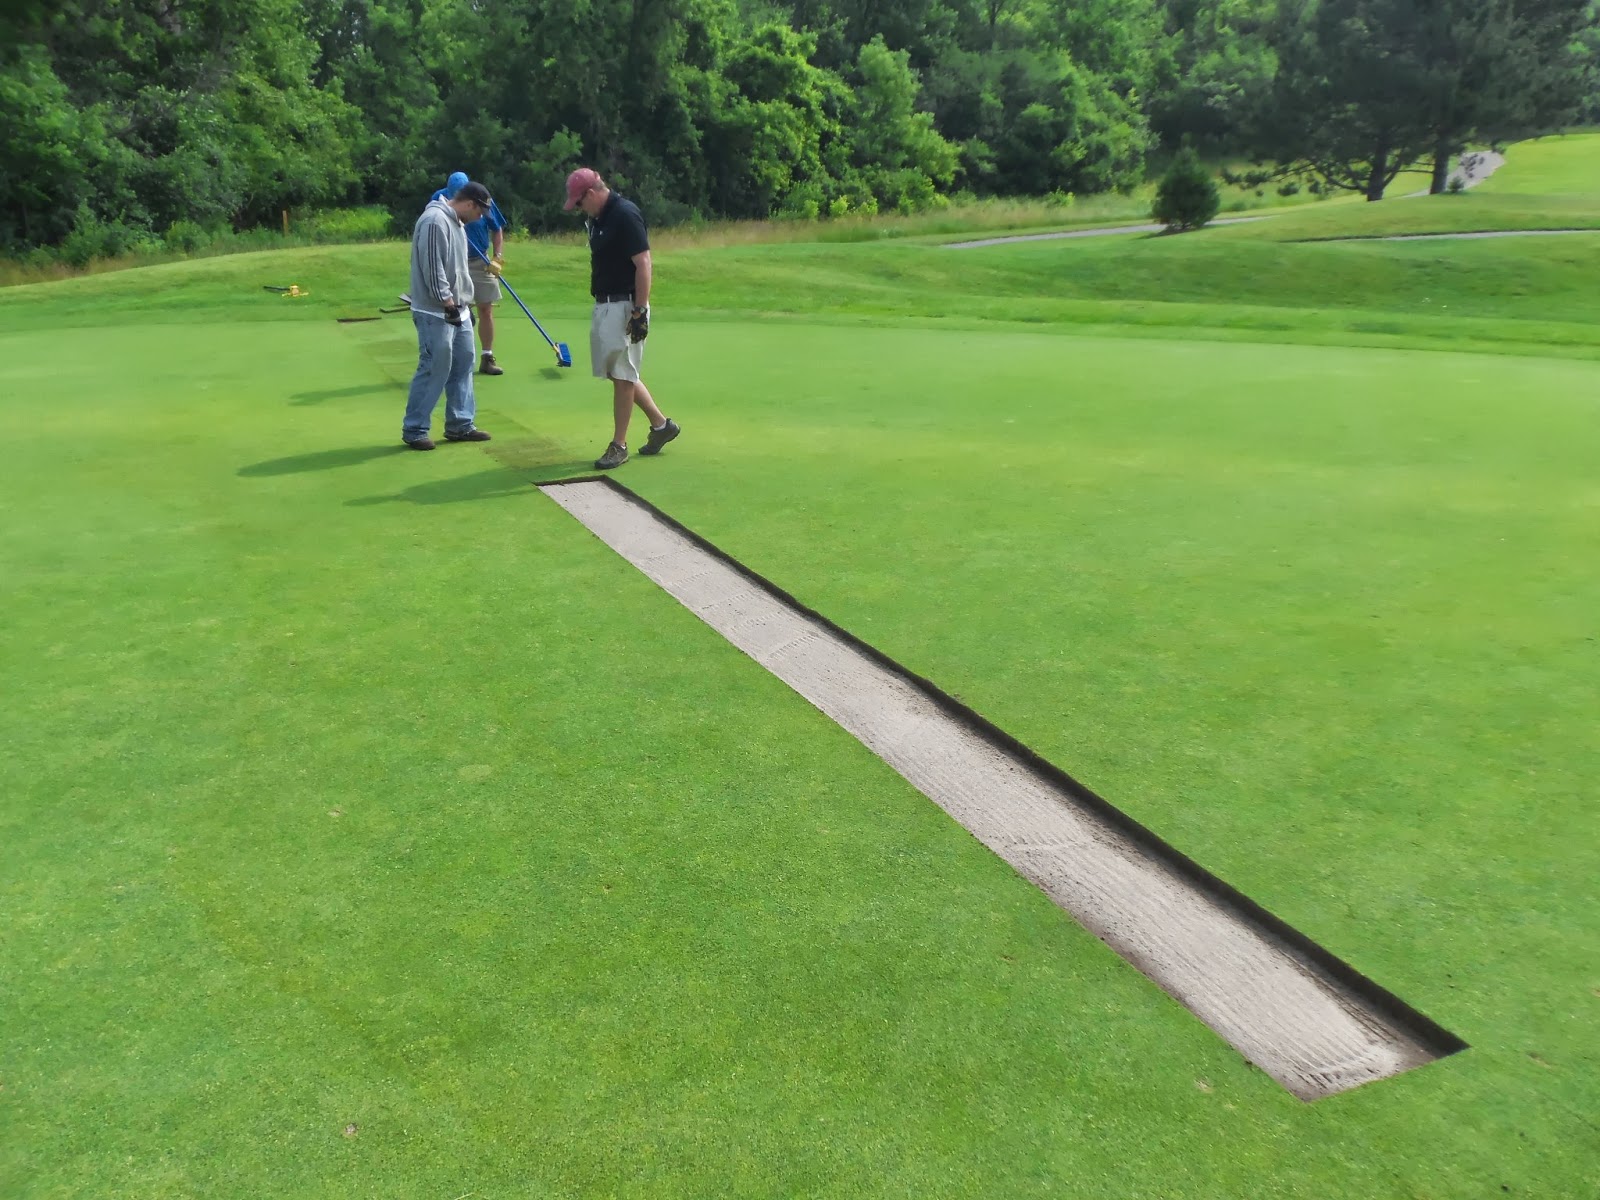
We used a sod cutter to run a strip right over the leak.

Sod is rolled up from the practice green and ready to be transferred to #1.

We are half done with laying the strip of new sod down. You can see the sand we put down under the sod to help level the new sod to the playing surface.

Almost done with the sod. We put sand down along the seams to fill and true the surface. This was then brushed into the turf.

Ready for play.


The sod strip three days latter. Slightly different fertility levels between the practice green and #1 green account for the difference in color. That will be rectified when we next fertilize.


Friday, April 15, 2011

Catching Up.

Things have been busy the last week or so. Golf season is finally upon us (as evidenced by the 80 degree weather we had last Sunday, hope you got a chance to get out and play.)

Here are some of the things we have been working on.
1) New irrigation installed on the left side of #3, between #1 and #3 and the left side of #16. Below is a picture of the lines on #3.


2) We put up a bat house that we got as a gift from Wendy Nagle's 2nd and 3rd grade class at the Ann Arbor Learning Community.


3) We deep-tine aerified all of the greens and hollow tined the collars. The deep tine aerification is a solid 14 inch long tine. This breaks through any layers that develop in our greens over time. #3 green is a prime example of this layering. After many years of topdressing on the greens, we now have 3-4 inches of sand on all of our greens. Unfortunately, water doesn't move readily through the change from one layer to the next. On #3, this means that all of the water from the spring tends to sit in the top 3 inches, making it waterlogged. This is why we had #3 green closed down this spring. The channel that the deep tine punches allows water to move past the layer and drain out of the soil profile.

After aerifing, we topdressed sand onto the greens to fill in the holes and smooth the putting surface.

4)We also turned on the irrigation system. We waited until after we had the new irrigation lines installed because it makes it a lot easier to do when the lines are not filled with water.

5) I saw this green heron (Butorides virescens) near the pumphouse. I love this little bird. It is not as famous as it's larger cousin, the great blue heron, but I think it is more interesting. That might be because I don't see them as much.

Friday, February 18, 2011

Warming Trend

Thanks to the last couple of days, with temperatures near 50 degrees, most of the snow we had in the last couple of weeks is gone. Greens 5, 8, 9 and 11 still have a fair amount of snow but the rest of them are pretty clear. With that, Leslie Park is hoping to open up the around the 25th of March. Huron Hills could be open as soon as March 4th.

Tuesday, December 7, 2010

Frost delays and why we have them


 Frost delays can be an annoyance. But they are also a very important tool for helping turf to survive the tough winter months. In this video, Dr. Larry Stowell of PACE Turf explains to golfers how frost can damage turf, and why a frost delay of even only two hours can make a big difference in turf's ability to survive.

Wednesday, September 29, 2010

Why do we aerate?

I have gotten more than a few questions on the reasons behind aeration of the greens and, to a lesser extent, the tees and fairways.  The following video does a great job of explaining the reasons.


The main takeaways from this video are:

1) Relieve compaction.

2) Reduce organic matter build-up.

3) Provide passageways for water and oxygen to move through the soil.

The sand top dressing also has the added benefit of smoothing the putting surface.

Tuesday, September 21, 2010

Aerification of greens

We have completed the aerification of the greens.  Leslie Park did the front 9 greens on Tuesday, September 14th and the back 9 on Wednesday.  If you are curious about the process we use, you can check some of the videos and pictures that I have.

First is the aerator, a Toro Procore 648.  It is self-propelled, 48 inches wide and has 30 3/8 inch tines.  The speed we use puts the tines down every 2 inches.  Here is the machine in action.

Here are the plugs that result


We then blow the plugs into the center of the green to make picking up the plugs easier.


We then pick up the plugs.  We pile the plugs up in our storage area and keep the pile turned over so the grass doesn't grow.  In the spring, we will use the material as we would use topsoil.


Here is a close of the green after we have picked up the plugs.


We then take a greens mower with special cutting units called "verticutters" installed.  These special units vertically mow the grass and basically cut grooves in the playing surface.  This stops the grass from growing along the ground and creates a  more upright plant.  This increases the speed the ball will roll along the green.


Here is a close up of the vericut units.


And a picture of the green after verticutting.


We then spread sand on the green with a machine called a topdresser.  The sand replaces the plugs that we have taken off. 


A picture of the green after the sand is put down.


We then use a large brush to move the sand into the holes.


After we are all done, the holes should be filled and the green should look like this.


A picture is worth a thousand words, so I wonder how many words video has saved me?

Thursday, September 2, 2010

Cartoons can do it, why can't you?

An animation from the USGA on how to repair a ballmark

I won't coment on the quality of the animation.  The information is good.

Monday, July 26, 2010

Stuff I have

I am very protective of "my" cart. It actually belongs to the City of Ann Arbor, but I am on that vehicle almost every single day. I also have a habit of trying to carry many tools and other items that I might need in a day. Trying to take care of 130 acres of grass can put me up to three quarters of a mile a way from the shop, so in order to save travel time, I carry a lot of "junk" with me at all times. Every thing I have with me, I have used more than once.  Here is what was on my cart today.


Starting from the bottom-left, coffee cup (super important), two-way radio, ready-to-use spot weed killer, swiss army knife, white turf paint, multi-tool, tape measure, adjustable wrench, soil thermometer, needle-nose pliers, utility knife, screw driver with interchangeable bits, rope "fib" (allows you to secure rope to itself with out knots), golf multi-tool with ball mark repair tool and soil probe. 

Next row from the bottom, starting at the left, garden pruners, water-proof notebook, flashlight, pen, on/off key for Toro irrigation heads, irrigation tool for taking apart irrigation heads, wire brush, hollow-braid rope, marking paint wand with yellow turf paint, business card holder, "Stimpmeter" (used in conjunction with golf balls and measuring tape to determine green-speed), Teflon tape, electrical tape, o-rings for irrigation heads, ballwasher wrench, ball mark repair tool, golf balls, towel.

Next row, grass trimmer, hose nozzle, spigot for tapping into irrigation system, "quick coupler" for tapping into irrigation system,  irrigation flags, 75 feet of 3/4 inch hose.  Not shown in the picture is the camera that I took the picture with and the 2-way radio that I use to program the irrigation system.

Wednesday, May 5, 2010

Topdressing Greens

This week, we began topdressing the greens.  This means that we put a light coat of sand on the top of the playing surface and then drag it into the turf canopy. This achieves two things: 1) it smooths out any bumps or dips that might be on the green and 2) it dilutes any thatch that might be on the green.

Smoothing the green out makes the greens "faster" and a ball will roll further when putted.  It will also make the ball roll more "true", meaning that the ball will roll where you intend it to go.

Thatch is a build-up of organic matter between the soil and the grass leaves.  Thatch is mostly comprised of decaying stolons and rhizomes and not leaf blades.  Despite popular misconception, removing the grass after cutting has no effect on thatch build-up.  A little thatch is a good thing for the grass, as it will protect the crown of the plant from traffic, ie, being stepped on. Too much thatch, however, will harbor insect and fungal pests as well as prevent water from reaching the soil.

Before topdressing, we also ran a verticutting unit over the greens before putting down the sand.  This is a rotating blade that digs down into the thatch and brings up some of that organic matter, as well as cuts any grass blade that might be laying over.  Because of this, we can incorperate some of the sand into the thatch layer and we can also eliminate any grain that develops on the playing surface.

After putting down the sand, we drag a brush over the green to work the sand into the turf.  After we are done, the green will be slightly "slower" than normal, but once the grass starts to grow back through the sand, it will be back to normal and hopefully, even faster.